
As a versatile manufacturing process, plastic injection molding has been applied in the production of various products in different sizes ranging from small components to large scale parts. Plastic injection molding machines are responsible for melting plastic materials into a liquid form, injecting that fluid into a mold, and shaping it as needed. As we will see in this guide, besides introducing various machine models and parameters—-such as temperature features and automation levels–we’ll look at everything from start-up routines through shutdown procedures.
Understanding Plastic Injection Molding Machines
Types of Plastic Injection Molding Machines
There are three main types of plastic injection molding machines:
- Hydraulic Machines: These machines use hydraulic pressure to power the injection process. They are known for their high clamping force and are suitable for producing large, heavy-duty parts.
- Electric Machines: Electric injection molding machines rely on servo motors to drive the injection process. They offer high precision, energy efficiency, and low noise levels, making them ideal for clean room environments and high-tolerance applications.
- Hybrid Machines: Hybrid machines combine the best features of hydraulic and electric machines. They use electric servo motors for the injection process and hydraulic systems for clamping, offering a balance between power and precision.
Key Components of a Plastic Injection Molding Machine
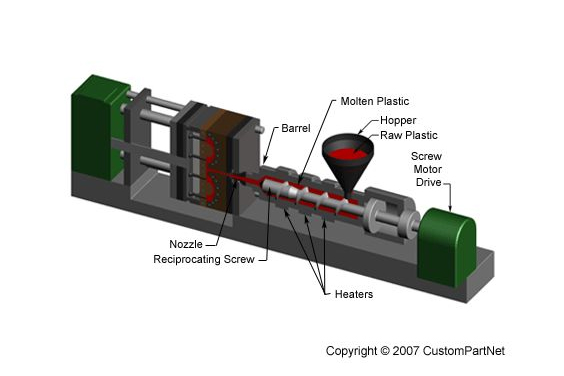
A typical plastic injection molding machine consists of the following key components:
- Injection Unit: This unit is responsible for melting and injecting the plastic material into the mold. It includes a hopper, a heating barrel, a screw, and a nozzle.
- Clamping Unit: The clamping unit holds the mold in place during the injection process and applies the necessary clamping force to prevent the mold from opening under pressure.
- Mold: The mold is a custom-designed tool that gives the plastic part its final shape. It consists of two halves – the cavity and the core – which are mounted on the clamping unit.
- Control System: The control system is the brain of the injection molding machine. It monitors and regulates various process parameters, such as temperature, pressure, and injection speed, to ensure consistent part quality.
Operating a Plastic Injection Molding Machine
Setting Up the Machine
Before starting a production run, the machine must be properly set up:
- Install the mold on the clamping unit and connect any necessary cooling lines.
- Load the plastic material into the hopper and set the appropriate processing parameters, such as barrel temperature, injection speed, and holding pressure.
- Perform a few test shots to ensure that the machine is running smoothly and the parts meet the required specifications.
The Injection Molding Cycle
The plastic injection molding process follows a repeatable cycle:
- Plasticizing: The screw rotates, feeding plastic pellets from the hopper into the heating barrel. The pellets are melted and homogenized by the heat and shear forces generated by the screw.
- Injection: The screw moves forward, acting as a plunger to inject the molten plastic into the mold cavity under high pressure.
- Cooling: The plastic in the mold cools and solidifies, taking on the shape of the mold cavity.
- Ejection: The mold opens, and the solidified part is ejected from the mold by ejector pins.
Monitoring and Adjusting Process Parameters
Throughout the production run, it’s essential to monitor and adjust process parameters to maintain consistent part quality. Key parameters to watch include:
- Barrel temperature
- Injection speed and pressure
- Holding pressure and time
- Cooling time
- Screw speed and back pressure
Adjustments should be made gradually and systematically, with only one parameter changed at a time to isolate the effect on part quality.
Maintenance and Troubleshooting
Preventive Maintenance
Regular preventive maintenance is crucial for ensuring the longevity and reliability of plastic injection molding machines. Key maintenance tasks include:
- Cleaning and lubricating moving parts
- Inspecting and replacing worn components, such as barrels, screws, and nozzles
- Checking and calibrating sensors and control systems
- Performing regular oil changes and filter replacements
Common Issues and Troubleshooting
Despite proper maintenance, issues can still arise during the injection molding process. Some common problems and their potential solutions include:
- Short Shots: Incomplete filling of the mold cavity, often caused by low injection pressure, insufficient material, or blocked vents. Solutions include increasing injection pressure, adjusting the shot size, and clearing vents.
- Flash: Excess material that seeps out of the mold along parting lines or ejector pin locations, usually due to excessive injection pressure or worn mold components. Remedies include reducing injection pressure, adjusting clamp force, and repairing or replacing mold components.
- Burn Marks: Discoloration or charring of the plastic, typically caused by overheating, slow injection speeds, or inadequate venting. Solutions include lowering barrel temperatures, increasing injection speed, and improving mold venting.
- Warpage: Distortion of the part after ejection, often due to uneven cooling, excessive packing pressure, or poor mold design. Remedies include adjusting cooling time and temperature, reducing packing pressure, and optimizing mold design.
When troubleshooting issues, it’s essential to approach the problem systematically, isolating variables and making incremental adjustments to identify the root cause. Keeping detailed records of process parameters and part quality can also help in identifying trends and preventing future issues.
Conclusion
Plastic injection molding machinery, whose design and structural complexity to operate efficiently need a thorough understanding of the process, can be appler effect solutions. Knowing your machine lets you optimize or fine-tune its most vital components in the injection molding cycle spells reduced product costs and consistency in quality parts. Doing routine maintenance and proper troubleshooting can also go a long way towards avoiding idle time. With the help of this guide, however, you will be fully ready and willing to master the art of plastic molding – let’s bring on your assignment!